Join Me in My Addiction!

Thank you for visiting my blog...and for allowing me to share with you my addiction. I love to collect recipes. I love to read cookbooks. I have been collecting recipes for as long as I can remember, and on any given day there are one or two (or more!) cookbooks residing on my nightstand!

This blog is chronicling my adventure as I fulfill my resolution of trying (at least) one new recipe each week. I hope that you enjoy!

I invite you to join me in my journey, simply by clicking the "Join this Site" link below. And please feel free to comment on any of the recipes, and pin away. Thanks, I look forward to sharing with you!

Thursday, February 28, 2013

"Almost" Alphabet Soup

Our kids love soup.  The youngest has loved soup from the first time he tried it, and will eat 2 or 3 toddler-sized bowls of soup in one sitting.  Our youngest is a bit more fussy in terms of what soup he will, but get the right one and he is a happy happy kid.  They both love Vegetable aka Alphabet Soup.  What kid doesn't?  And I figured I could probably make a big batch of homemade soup for the family...enter my search to find alphabet pasta.  No luck (yet) but I did find some great ring pasta and also bug shaped pasta! Perfect!

I made some homemade vegetable soup - my "Almost Alphabet Soup" using this vegetable stock as the base.  Here is what I did:

Ingredients
Almost Alphabet Soup | Addicted to Recipes

4 cups vegetable stock
2 large carrots, peeled and sliced
1 stalk celery, sliced
1 cup green beans, sliced and ends removed
1/2 cup frozen green peas
1/2 cup corn kernels
Pepper to taste
3/4 cup "O" pasta

In a large pot, slowly reheat the vegetable stock.  Add in all of the vegetables and allow to simmer for about 15 minutes.  Bring the soup to a slow boil, add in the pasta.  Slow boil for about 5 minutes.  Remove from heat, serve, and enjoy!

VERDICT:
The soup was a hit, especially with the kids.  I'm already thinking about my next version using those bug shaped noodles!  Stay tuned!

Tuesday, February 26, 2013

Recipe Recap #5

Hello friends! Welcome to this week's Recipe Recap!  Looking back, the week of February 24-March 2 was a busy one for recipes.  Here they are!

Banana Caramel Cream Pie
Must be the time of year, I just made another version of the Banana Cream Pie - the new recipe will be posted very soon :-)


Banana Caramel Cream Pie | Addicted to Recipes


Salmon with Sundried Tomatoes and Capers


Salmon with Sundried Tomatoes and Capers | Addicted to Recipes


Kung Pao Pork
This is one that we just loved.  I'm craving it now...


Kung Pao Pork | Addicted to Recipes


Before I go...Addicted to Recipes is in the running for the Top Food Blog 2013 at voiceBoks.com.  Would love your vote...just two little clicks and you don't need to register for anything...thanks!  Here is the link! (or click on the image below)


See you next week!


Monday, February 25, 2013

Vegetable Stock

Alrighty, here we go with what might be a new phase...soup!  Our oldest son has informed us that he "no longer likes sandwiches for lunch"...and that he "only wants soup."  Eeks.  I know it's just him testing us, but I've also been wanting to make some fresh soups.  Our kids loves "Alphabet Soup" so I have been thinking about how to make our own homemade version.

Enter last week, when my Mother-in-Law came to visit.  She came bearing gifts, specifically a new cookbook for me.  Hello, awesome!  Started to flip through the book, and one of the first recipes I came across was "Vegetable Stock".  Perfect for my quest to make the kids a homemade alphabet soup. Here is the recipe:

Vegetable Stock (Source: My Father's Kitchen)

1 large onion, peeled and chopped
2 carrots, peeled and chopped
1 stalk celery, chopped
1 leek, chopped
3 cloves garlic, peeled and whacked with a knife
4 sprigs fresh parsley
2 teaspoons thyme (original recipe called for 4 sprigs fresh thyme, but fresh thyme was hard to find)
1 teaspoon tarragon (original recipe called for 2 sprigs fresh tarragon, but again, hard to find)
1 bay leaf
1 teaspoon coarse salt
1 teaspoon peppercorns (I used a 4 Pepper Blend from Epicure)
12 cups of cold water

Fill the pot with the water.  Add in all of the vegetables and spices.  Heat to boiling, reduce heat and simmer for 45 minutes.  Remove from heat and cool.  Strain and portion into storage containers (in portions).   The stock can be frozen for up to 6 months, or keep in your fridge for no more than 2 weeks.

Stay tuned to see what recipes I use the vegetable stock for!

Thanks for visiting today...I hope you have a great day!

Sunday, February 24, 2013

Scrumptious Sunday Recipe Link Party #52

Addicted to Recipes
It's my ONE YEAR ANNIVERSARY for hosting Scrumptious Sunday!  Woohoo!  I can't believe that this is my 52nd link party.  Each week it gets better and better.  THANK YOU for joining me in my addiction!

This weekend my hubby and I are also celebrating our 7th wedding anniversary - our anniversary was a few days ago, but we are celebrating this weekend.  Yay!

Before we get to this week's party, I'm celebrating my link party anniversary by giving away a few prizes - premium ad space here on my blog for 30 days and wall vinyl "Welcome to our Home"  Enter via the rafflecopter below!  (CAN/US only - please read the terms and conditions)


a Rafflecopter giveaway

Scrumptious Sunday Recipe Link Party #52 is now live!  Here is the LINK to get you over to the party!

Thanks so much for stopping by, sharing your recipes, and checking out some of the fabulous recipes already posted at the party!

Friday, February 22, 2013

Scrumptious Sunday #51 - Features

Hello everyone! Welcome to Feature Friday (part 2)! (Did you check out the features, part 1?) I hope your week has been fantastic.  We've been busy as ever - last weekend we had company and there was lots (and lots) of hockey going on.  It was great fun all around!  This week my husband and I celebrated our 7th wedding anniversary!  At work, things are ramping up...everywhere, all around, life is busy but good!

Did you catch my posts this week?


Here are the features from Scrumptious Sunday #51:

If you are featured this week, please grab a BUTTON from my button page


I was featured, I was Featured by Addicted to Recipes


My little family has been titled "Honourary Greeks" in our Greek friends' community...and since I love almost all Greek food, this feature is a given for me :-)
Traditional Greek Pita Bread from Half Baked Harvest


Traditional Greek Pita Bread

I love lasagna, it's one of my favourite foods.  This sounds good.  And since it's from Tara, I am pretty confident it will be!
Lasagna Soup from Noshing With The Nolands


Lasagna Soup

I'm on a bit of a homemade soup kick right now (stay tuned to the blog...you will see!).  And I also love chicken pot pie.  This sounds delicious!
Chicken Pot Pie Soup from Sunflower Supper Club


Chicken Pot Pie Soup

And we can't forget dessert!  And that I am a total cookie monster...
Peanut Butter Nutella Oatmeal Chocolate Chip Cookies from My Favorite Finds
PBNutella Cookies

Thanks so much everyone for all your fabulous recipes!

This week's party marks my ONE YEAR ANNIVERSARY hosting a link party!  What a ride it has been!  Thanks everyone for your continued support and participation!  

Don't forget, Scrumptious Sunday will be back starting this Saturday night at 8 pm! Can't wait to see all the goodness you bring next week!

Scrumptious Sunday #50 - Features

It's time for Feature Friday (Part 1!) - Stay tuned for Part 2...

Before we get to that, did you have a chance to check out my posts this week?


Not a surprise, but it was another FANTASTIC week of recipes shared with everyone at Scrumptious Sunday - thank you so much!

If you are featured this week, please grab a BUTTON from my button page


I was featured, I was Featured by Addicted to Recipes


I have a good friend with Celiac's disease, so I have been learning a lot about gluten-free meals.  This is a great little collection of GF recipes:
It's Cool To Be...Gluten Free from The Thriftiness Miss


These just sound super-intriguing!  I was hooked at popper :-)
Monte Cristo Poppers from See Aimee Cook


I'm always on the hunt for a new chicken recipe, and this sounds really good!
Red Curry Yogurt Chicken from The Tasty Fork


The Tasty Fork - Red Curry Yogurt Chicken

I love pie. This looks divine!
Strawberry Cream Pie from The Unsophisticated Kitchen


And I love fudge. I need to make it again soon!
Red Velvet Berry Fudge from The Velvet Moon Baker

Red Velvet Berry Fudge


Don't forget to check out the other features being shared this week, over here in Part 2!

7th Anniversary Gift

Yesterday, my husband and I celebrated our 7th wedding anniversary!  7 years...wow, time sure flies!  It's been a great ride, with lots of ups and a few downs...all in all, life is good.  I am a pretty lucky gal!

He and I have always been pretty traditional with our anniversary presents.  I think we both like the challenge that sometimes comes with each year.  He always puts a lot of thought into the gifts he gives me, and we usually stick to the traditional gifts (according to all those lists out there!).  Speaking of...I'm sure looking forward to our 10th...hello diamonds! :-)

The traditional gift for the 7th wedding anniversary is copper or wool (the modern gift is a desk set), and this year I was soooooo happy with the gift that I got for him.  I was also so happy because it is something that he will have with him every day...and because one of my blogging friends made it for us...here is the beautiful copper key ring that Amy from One Artsy Mama created just for us!  We both love it! Thank you Amy!


7th Anniversary Copper Key Ring by One Artsy Mama | Addicted to Recipes

If you haven't checked out Amy's blog or Etsy shop - you must! 

Thursday, February 21, 2013

Kellogg's Canada - New Product Giveaway!

Kellogg's = New Products February 2013 | Addicted to RecipesThis week we received samples from Kellogg's of their newly launched products.  I'm a bit of a granola bar junkie, so I am super excited about my new work snacks - the Nutri-Grain Soft Bakes and the Special K Granola Bars.  I have tried the Dark Chocolate Granola Bars before and I really like them.  I am excited for the peanut butter granola bars. My hubby is happy to see the new cracker chips (he's a big chip guy) - and is especially excited to try the Zesty Southwest flavour of the Special K Cracker Chips.  And the cereal is always a great snack for the kids - they both like to eat dry cereal as a snack and we love having variety for them - I think they will enjoy both the Raspberry flavoured Mini-Wheats Centres and the All-Bran Cranberries & Clusters (I'm thinking there my be a muffin recipe with the latter...)

I am happy to let you know that YOU also have a chance to WIN free product coupons (FPCs) for each of these products!  This is a $30 value in free products!!  

Here is the list of coupons that one lucky winner will receive:
1 free Box of Nutri-Grain Soft Bakes
1 free Box of All-Bran Cranberries & Clusters
1 free box of Special K Granola Bars
1 free box of Special K Cracker Chips
1 free box of Mini-Wheats Centres - Raspberry Flavour
1 free box of Kashi Blueberry Oat Clusters & Flakes


This contest is open to CANADIANS ONLY.  Please enter via the Rafflecopter below.  Once selected, the winner will be contacted via email and will have 48 hours to respond.  If there is no response after 48 hours a new winner will be drawn.  Thank you for stopping by, and GOOD LUCK!

a Rafflecopter giveaway

Tuesday, February 19, 2013

Recipe Recap #4

Hello friends! Welcome back to my recipe memory lane.  Here are the recipes from the week of February 17 - 23, 2012.

Baked Egg Cups
These have been a great little recipe discovery for us.  So easy and a nice change from PANCAKES! LOL


Great breakfast idea, especially when you have a house full!


Chicken Asiago Dijon
Funny, I was just thinking about this recipe.  We haven't made it in a few months, but it certainly is time.  This one was popular in our house last year.


This chicken has great flavor - Chicken Asiago Dijon

See you next week!


Monday, February 18, 2013

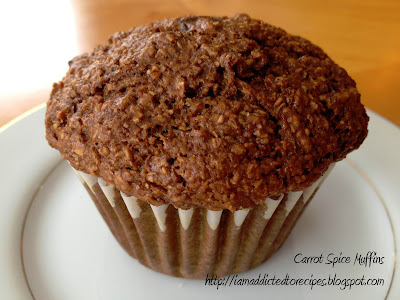
Carrot Spice Muffins

Another weekend, another batch of muffins!  This time I went for a recipe with some bran and wheat germ and a little bit of "spice".  This one is tagged as "dark and nutritious with spicy overtones".  Verdict is below!
 
Carrot Spice Muffins (Source: Company's Coming - Muffins and More)
A dense, moist muffin with an all-around nice flavor
1 1/2 cups flour
1 1/2 cups natural bran
1/4 cup wheat germ
1/2 cup packed brown sugar
2 teaspoons baking soda
1/2 teaspoon salt
1 teaspoon cinnamon
1/4 teaspoon nutmeg
 
2 eggs
1/4 cup molasses
1/4 cup cooking oil
1 1/2 cups milk
2 tablespoons vinegar
1 cup grated carrot
1/2 cup chopped walnuts (I didn't put the walnuts in so that I could send the muffins to school/daycare)
1 cup chopped dates or raising (I used raisins)
 
Preheat oven to 400F.
 
In a large bowl, combine the flour, bran, wheat germ, brown sugar, baking soda, salt, cinnamon and nutmeg. Make a well in the middle.
 
In a separate bowl, beat eggs.  Add in the molasses, oil, milk, vinegar, carrot, walnuts and dates/raisins.  Stir to combine.  Pour the wet ingredients into the dry ingredients.  Stir just to moisten.  Fill prepared muffin cups 3/4 full.  Bake for 20-25 minutes (20 at my house). 

VERDICT:

My hubby said these were good, but not as good as the raisin muffins.  The kids loved these, and I thought they were nice.  A dense and moist muffin, a hit in my book.  I didn't find them that "spicy". Just all-around nice flavour. 
 

Tuesday, February 12, 2013

Recipe Recap #3

OK, I have to tell you, I am just loving this trip down memory lane with my weekly recipe recaps.  What great memories from last year.  And inspiration for me for this year.  So cool!  Welcome to Recipe Recap #3 for the week of February 10 - 16, 2012.  There is one delicious recipe to recap...Enjoy!

Lobster Fettuccine
Our delicious Valentine's treat from last year.  And when I discovered fennel.  Oh yum!  Might be time to make this one again.  Must watch for a lobster sale.


A decadent Valentine's dinner - Lobster Fettucine


See you next week!


Monday, February 11, 2013

Valentine's Heart Cookies

Valentine's Heart Cookies | Addicted to Recipes
As much as I like to bake, I'm not always the most creative.  I adore all the beautiful cakes, cupcakes and cookies that so many skilled bakers make,s I try, I am just not that talented.  One day I hope to take some classes so that I can learn proper methods rather than just winging it.

Having said that, I do keep trying, and from time to time I see something that I think I can try.  With the Valentine's season upon us, I wanted to make fun, special cookies for my family, and I wanted it to be something that I could do with our oldest.  In my cookbooks I have all sorts of recipes for great cookies, especially Christmas-themed ones.  I scanned my books and couldn't find "the ror this project, so I headed over to Pinterest to see what I could find.  And I found these :-)

Here is the recipe:

1 cup unsalted butter, room temperature
1/2 cup sugar
1 1/2 teaspoons vanilla extract
1/4 teaspoon salt
2 1/2 cups flour

2 tablespoons cocoa powder

Red or pink food coloring

1 egg
1 tablespoon water

Plastic wrap

Preheat oven to 350F.  Line baking sheet with parchment paper.

Using a mixer, cream the butter and sugar well.  Add in the vanilla and salt.  Gradually add in the flour.  

Valentine's Heart Cookies | Addicted to RecipesOnce combined, remove the dough from the mixer and turn it out onto a clean surface.  Using your hands, knead the dough until it comes together.  Divide the dough into three equal sized balls.  (The original recipe suggested using your handy kitchen scale to take the guesswork out of dividing equally - great tip!).

Take one ball of dough and lay it out on a piece of plastic wrap.  Sprinkle the cocoa powder on top and knead, knead, knead until the cocoa is mixed in well.  Set the cocoa ball to the side.  Discard the plastic wrap and wash your hands well before moving on.

Take the second ball of dough and lay it out on a fresh piece of plastic wrap.  Add food coloring to the dough (I used pink).  Knead and knead and knead to work the colouring into the dough, add more colouring as needed to attain the colour you are after.  Set the pink dough aside.  Discard the plastic wrap and wash your hands well before moving on.  You should now have three balls of dough - brown, pink and white.

I found at this point that I needed to put the three balls of dough into the fridge for a few minutes to harden it up slightly before moving on to the next step.

Lay out a fresh piece of plastic wrap.  Place the third (untreated) ball of dough on the wrap, smoosh it down a little.  Cover with another piece of plastic wrap.  Roll the dough into a square / rectangle shape until it is approximately 3/8 inch thick.  Using a butter knife, slice the dough into strips, approximately 3/4 inch wide.  Carefully slide the plastic wrap and dough onto a cookie sheet.  Set aside.  Repeat for the cocoa and pink balls of dough.

Valentine's Heart Cookies | Addicted to RecipesYou may find that you need to pop the dough into the fridge again - doesn't hurt if it will help you through the process!

Whisk together the egg and water.

Cover your work space with a fresh piece of plastic wrap.  Alternating between the three colours, carefully take a strip of dough and place it on the new piece of plastic wrap.  Brush the edges with the egg mixture (this is the glue that will hold the dough together).  Carefully press each strip to the previous strip.  Don't worry if your strips are different thicknesses, we'll work those out in an upcoming step.  Repeat the pattern until you have used all of your dough strips.

Lay a new piece of plastic wrap on top of the patterned dough.  Using your rolling pin, carefully roll along the top of the dough, both horizontally and vertically - use just enough pressure to even out the levels of the dough and to make sure that each strip is sticking.

This is the point where I enlisted the assistance of my 5 year old.  We took our mid-sized heart-shaped cookie cutter and cut our cookies from the striped dough.

Carefully transfer the cut out hearts to the cookie sheet.

Bake for 9-11 minutes (or longer or shorter, depending on your oven/altitude, etc).  Allow the cookies to cool before transferring to a cooling rack.

Makes approx. 30 cookies

Valentine's Heart Cookies | Addicted to Recipes

VERDICT:

While these were a finicky cookie to make, it was a fun experience, and my son really enjoyed the whole process.  He also adored the cookies, both their colourfulness and their taste.  They aren't a sweet cookie, actually a good tea-dipping cookie.  The cookies got two thumbs up from the kids.

Sunday, February 10, 2013

Scrumptious Sunday Recipe Link Party #50

Addicted to Recipes
Good afternoon, and happy Sunday to you!  How is your weekend going?  Ours has been great so far - it is our first Family Day long weekend this weekend, and we are enjoying that extra day with our family.  

Just a quick little post to let you know that Scrumptious Sunday Recipe Link Party #50 is now live!  Here is the LINK to get you over to the party!

Thanks so much for stopping by, sharing your recipes, and checking out some of the fabulous recipes already posted at the party!

Saturday, February 9, 2013

How Do You Preserve Your Food?

Recently we were given the opportunity to try out the Foodsaver V3460.  In our house, we are totally new to the Foodsaver system, I've always wondered about them, but never invested.  We have friends who swear by their Foodsaver systems, so we were pretty excited to test our own.  

Given the amount of food that goes through our house in a given week, we are big on "stocking up".  Whether it be meat purchases or fruit when it is in season, we like to get good value for our money and keep a freezer full of good food choices.

I didn't do any research on the Foodsaver prior to using our new system.  I didn't want to be swayed by anyone else's opinions.  When the box arrived, we were surprised at its size.  It's not huge by any means, but it is a decent size, given what it can do for us.

I will admit that when we first opened her up to test her out, we were a little overwhelmed.  Not quite sure how it was all going to work, but we read through the instructions, did our first run "step by step"...and after that first run, we were all "hey, this is totally easy!"  My hubby got quite involved in the process and quickly set to work making our own bags.  It didn't take long to package up our chicken and pork for the freezer.  Easy breezy!

So now that we've given it a go (and have discovered how easy the process is) - I took a look online.  I learned a lot!  I found this great chart on storage comparisons, which I just love:


Food Storage Comparisons

FREEZEROrdinary StorageFoodSaver System
Beef, Game & Poultry6 months2-3 years
Fish6 months2 years
Soups & Stews3-6 months1-2 years
Coffee Beans6-9 months2-3 years
Vegetables8 months2-3 years
Bread6-12 months1-3 years
REFRIGERATOROrdinary StorageFoodSaver System
Cheese1-2 weeks4-8 months
Lettuce3-6 days2 weeks
Berries1-6 days1-2 weeks
PANTRYOrdinary StorageFoodSaver System
Flour & Sugar6 months1-2 years
Rice & Pasta6 months1-2 years
Cookies1-2 weeks3-6 weeks

I am particularly pleased with the difference in storage times for the freezer items and the berries.  While I don't expect any of our food products to remain in our freezer or fridge for the extended periods of time shown above, I am happy to know that the option is there should we need it!

The Foodsaver will be a welcome addition to our kitchen - especially for our bulk purchases and ensuring they last as long as we are needing them to!

If you want to learn more about the Foodsaver system, head on over to their website and Facebook page!


Disclosure - I received product in exchange for my honest opinion.  The views expressed in this post are solely my own.


Friday, February 8, 2013

Scrumptious Sunday #49 - Features

Welcome to Feature Friday!  I hope that you have had a wonderful week.  We are gearing up for our first Family Day long weekend here where we live.  A brand new stat holiday - we are pretty excited about that. 

Did you get a chance to check out my posts this week?  If not, here they are:


And now, onto this week's features!  You'll note that I am totally having sweet cravings today :-)  

If you are featured this week, please grab a BUTTON from my button page
I was featured, I was Featured by Addicted to Recipes


If you haven't visited Winnie's blog before, you must.  She makes beautiful food!
Snickers Cake from Winnish

Snickers Cake

Need I say anything about the next feature?!
Dark Chocolate Creme Brulee with Vanilla Sugar from Half Baked Harvest

Dark Chocolate Creme Brulee

I haven't made magic bars before, it may be time I try!
Lemon Meringue Magic Bars from The Velvet Moon Baker

Lemon Meringue Magic Bar


And off the sweet train and onto the bread train.  I'm a big bread girl, and English muffins are a favourite.  
How to Make English Muffins from Feeding Big

English Muffins

Congratulations everyone!   I'll be sharing these through my Facebook, Twitter and Pinterest accounts.

Don't forget, Scrumptious Sunday will be back starting this Saturday night at 8 pm! Can't wait to see all the goodness you bring next week!

Thursday, February 7, 2013

Taco Bake - Slow Cooker Thursday

BWelcome to this week’s installment of Slow Cooker Thursday!  I’m trying something quite a bit different for us this week.  I’ve been making lots of soups lately so I figured it was time to go outside the new slow cooker comfort zone J  This week I found a recipe for a Taco Bake that sounded interesting.  I figured, we all like tacos here, and this gives me a chance to try another new recipe in my new Crock-Pot.  Here is the recipe:


Taco Bake (Source: Crock-Pot Slow Cooker Cuisine cookbook)


Great slow cooker recipe - Taco Bake - perfect for a cold winter day
1 pound ground beef
1 onion, chopped
3/4 cup water
1 1/4 oz taco seasoning
31 oz tomato sauce (can be achieved using multiple cans of tomato sauce, or measured using your handy kitchen scale)
8 oz macaroni, uncooked
4 oz mild chopped green chilies
2 cups shredded cheddar cheese


In a large skillet, brown the ground beef and onion.  Drain off any excess fat.  Add water, taco seasoning and the tomato sauce.  Mix well and simmer for 20 minutes.


Transfer the mixture to your slow cooker.  Stir in the macaroni and the chilies.  Cover and cook on LOW for 6 – 8 hours or on HIGH for 3-4 hours.

In the last 30 minutes of cooking, top with the shredded cheddar cheese.
VERDICT:
This wasn't too bad!  The macaroni noodles were a little squishy in my hubby's opinion, but I didn't mind.  It all blended together quite nicely.  While the original recipe called for 1 1/4 oz of taco seasoning (as in a package of taco seasoning) - I make my own taco seasoning and used that instead.  I also used less than what was called for, because I know my seasoning can be spicy, especially if simmering all day - and I know that our oldest wouldn't be too happy with overly spicy food.  There was a great spice to this - it wasn't crazy hot or anything, it was a nice warm flavour that had kick but didn't burn your throat and stomach.  I liked that!  And the leftovers were great for lunch :-)

Tuesday, February 5, 2013

Recipe Recap #2

Hello everyone, welcome to my look back at the recipes I shared one year ago.  Here are two recipes from the week of February 3 - 9, 2012. I hope you will enjoy these recipes and the updates that I have for this year!

Toffee Crunch Lunch Box Cookies
These ones are still among my hubby's favourites.  For a non-dessert guy (ha!).


My hubby's favourites! Toffee Crunch Lunch Box Cookies

Pork Tenderloin
We haven't attempted this recipe again.  We liked it, but we didn't love it.  But you might!


Wrapped pork tenderloin


I hope you enjoyed Recipe Recap #2 - see you again next Tuesday!

Monday, February 4, 2013

Raisin Muffins

Why yes, the muffin lady is back!  We do tend to make a batch of muffins each week, and pf course from time to time we like to try out new muffin recipes that we come across.  Sometimes those new recipes are based on things we have on hand (maybe a special fruit), or like me this week, based on my lack of desire to go to the grocery store, so I shopped in the pantry to see what I could come up with!

This time I came across a recipe for Raisin Muffins.  Sounds easy enough…and I had tonnes of raisins.  Here is the recipe:

Raisin Muffins (Source: Company’s Coming, Muffins & More)

My hubby loves these, raisin muffins - cook the raisins first!
1 1/2 cups raisins
1 cup water

½ cup butter
¾ cup brown sugar
1 egg
1 teaspoon vanilla

2 cups flour
1 teaspoon baking powder
1 teaspoon baking soda
1/4 teaspoon salt
1/2 teaspoon cinnamon
1/2 teaspoon nutmeg

Preheat oven to 375F.  Prepare muffin tins (either grease or line with liners).

Measure raisins into a saucepan, pour in water.  Bring to a boil, and then simmer covered for 10 minutes, or until the raisins are plump and tender.  Remove the saucepan from the heat, uncover and cool.

In a large mixing bowl, cream together the butter, sugar and egg.   Cream well.  Add in the vanilla.  While creaming, drain the raisins, measuring out and reserving 1/2 cup of the raisin juice in the saucepan.  Stir the drained raisins into the batter.

In a bowl, combine the flour, baking powder, baking soda, salt, cinnamon and nutmeg.

Alternating between the flour mixture and the raisin juice, add each mixture into the creamed mixture until just mixed.

Fill muffin cups 3/4 full.  Bake for 17-20 minutes.  Remove from oven and allow to cool slightly before removing from pan.

VERDICT:
In my raisin-loving house, these relatively simple muffins were a huge hit.  My husband and the toddler both especially enjoyed them.  The cookbook did say that nuts could be added to the batter, though I opted not to (so that the muffins could be included in the kids’ lunches).  These are keepers for our crew!